Configure the Ultra Commerce Shipping Quotes App
After you have successfully installed the Ultra Commerce Shipping Quotes app for BigCommerce, you must configure the app for it to show shipping quotes during your BigCommerce store checkout process.
To configure your Ultra Commerce Shipping Quotes app for BigCommerce for the first time:
1. Log in to BigCommerce.
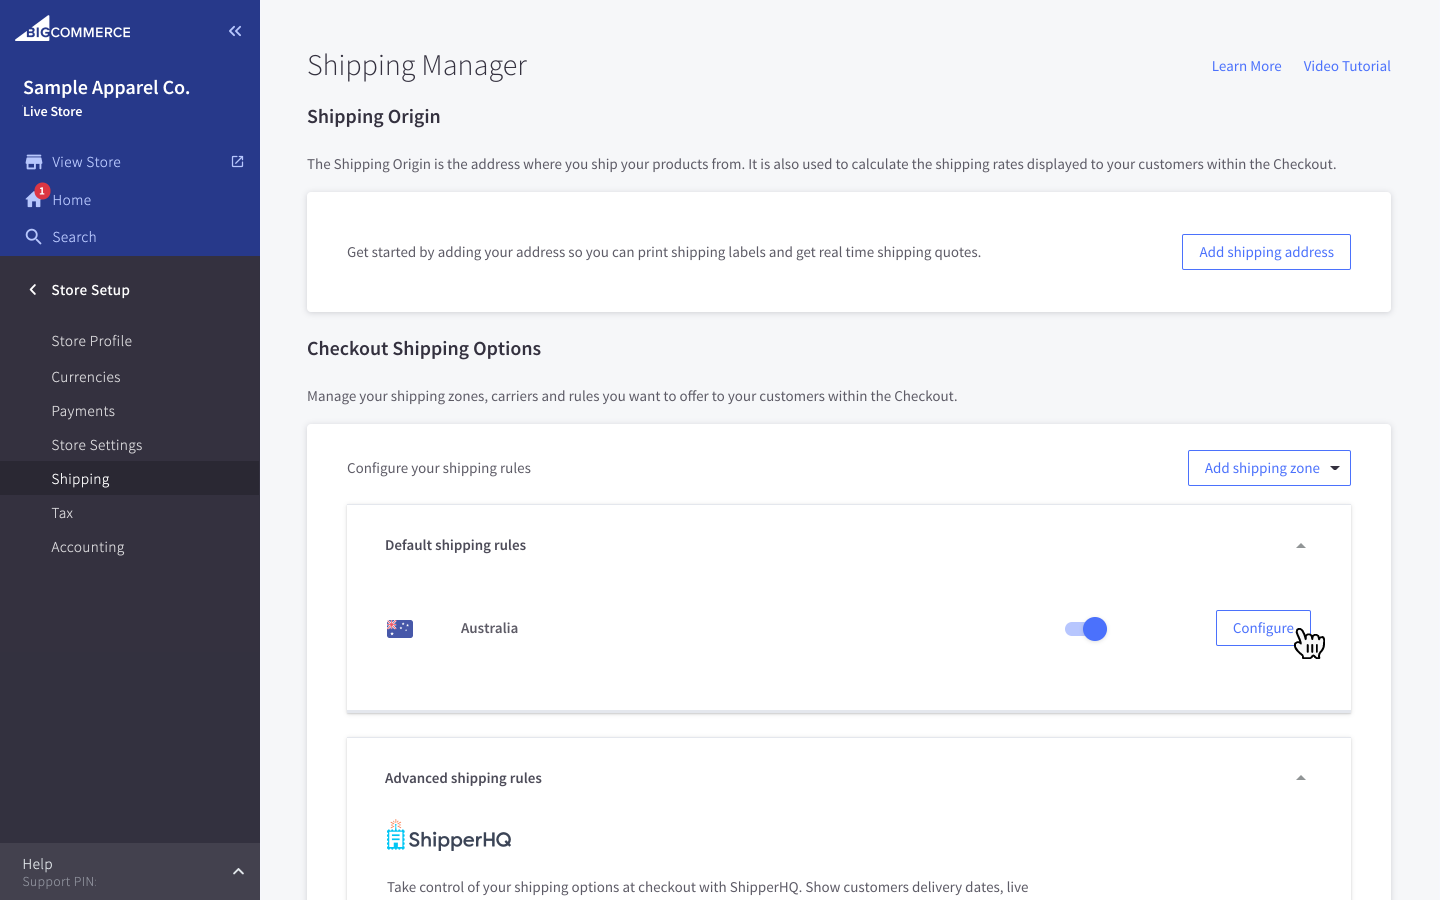
2. Go to the Store Setup menu from the menu panel on the left-hand side of the screen and click Shipping.
3. (Optional) In the Shipping Manager screen, enable the shipping zone you want to configure.
4. In the Shipping Manager screen, click the Configure button next to the shipping zone where you want to use the Ultra Commerce app.
5. (Optional) In the shipping zone’s page, enable Ultra Commerce’s Shipping Quotes, if disabled.
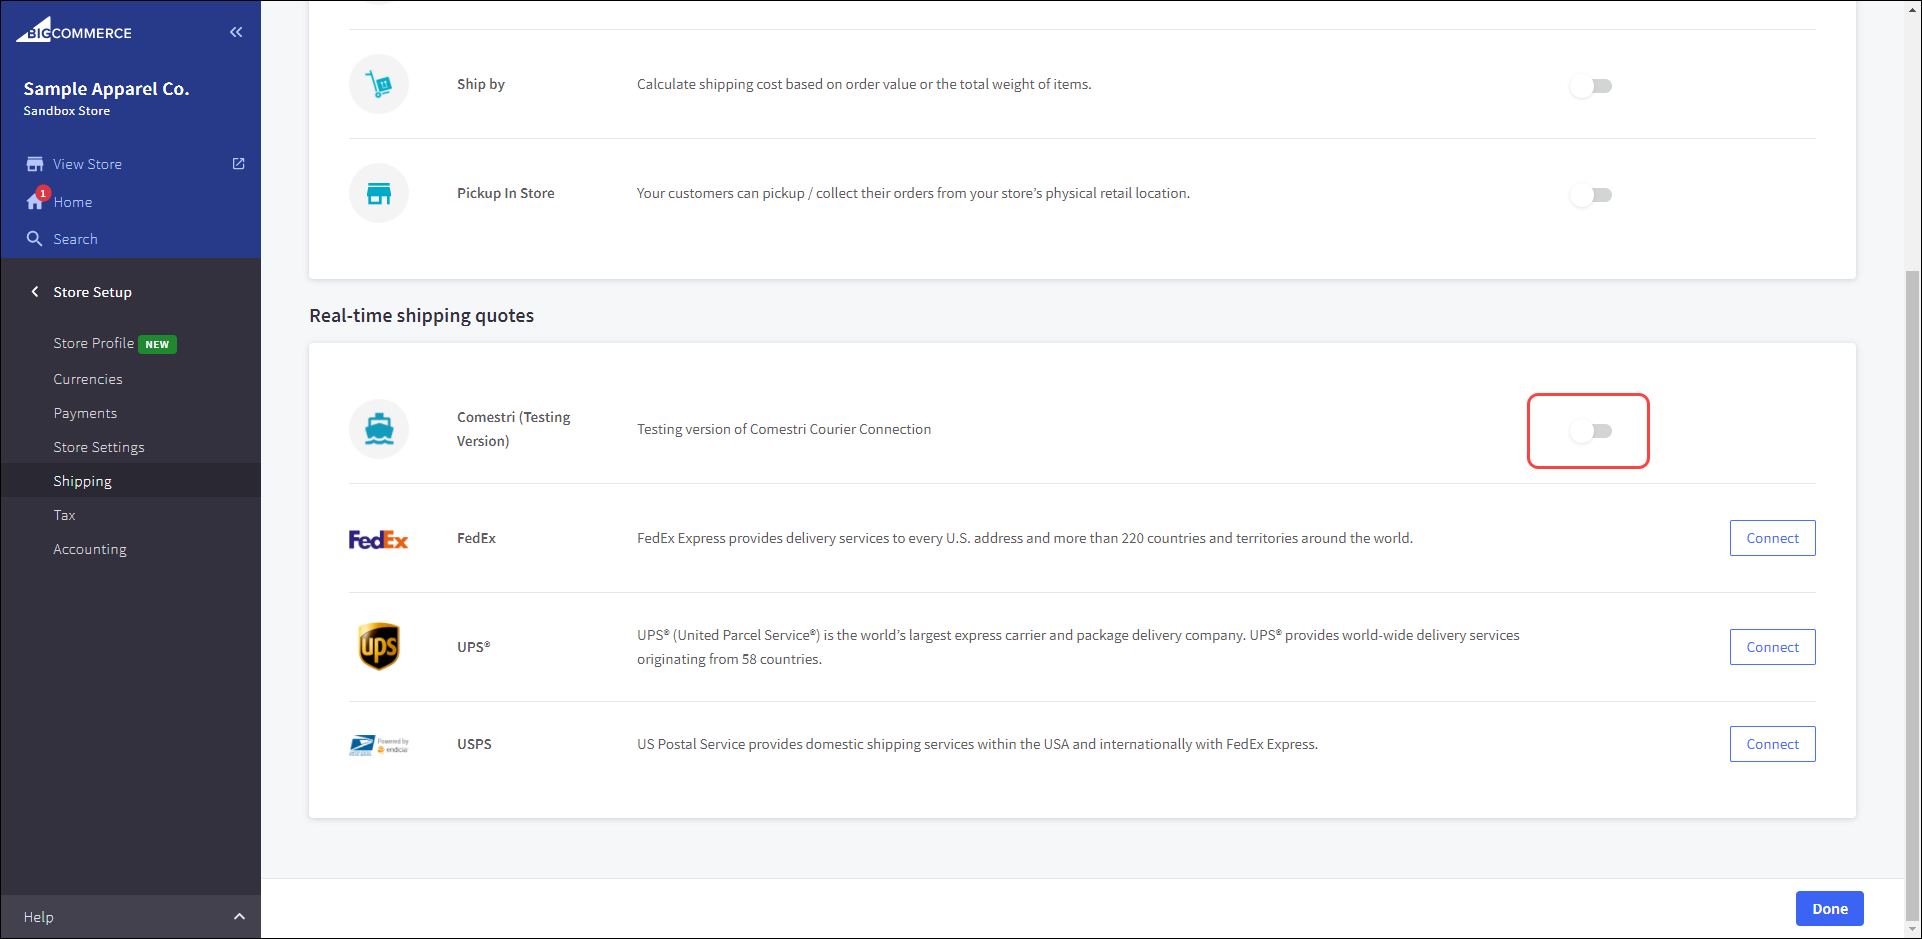
6. In the Real-time shipping quotes section, select the Connect button next to the Ultra Commerce’s Shipping Quotes.

7. The app’s Configuration box will open. In the Settings tab, enter the required details in the fields. Refer to the Table of Configuration Fields below for more information.

8. Click on the Connection tab and enter the Rate Token obtained at the end of the installation process in the Token field.
![]() You can also click on the Ultra Commerce Shipping Quotes app from the MyApps page in BigCommerce and copy the Rate Token at any time after a successful installation.
You can also click on the Ultra Commerce Shipping Quotes app from the MyApps page in BigCommerce and copy the Rate Token at any time after a successful installation.

8. Click Submit to save the changes.
Table of Configuration Fields
|
Display Name* |
The name for the shipping quotes generated by the Ultra Commerce Shipping Quotes app.
|
|
Display name for Standard Shipping |
Use this field to customise the name for the Standard Shipping rate that appears when choosing shipping method in the BigCommerce store checkout process. An example name for the shipping rate
You can also use Ultra Commerce’s shipping label macros to add more information to the shipping rate name when you are naming this shipping rate. Refer to Shipping label macros section below for more information. An example name for the shipping rate (with a macro)
|
|
Display name for Express Shipping |
Use this field to customise the name for the Express Shipping rate that appears when choosing shipping method in the BigCommerce store checkout process. An example name for the shipping rate
You can also use Ultra Commerce’s shipping label macros to add more information to the shipping rate name when you are naming this shipping rate. Refer to Shipping label macros section below for more information. An example name for the shipping rate (with a macro)
|
|
Display name for Next day Shipping |
Use this field to customise the name for the Next day Shipping rate that appears when choosing shipping method in the BigCommerce store checkout process. An example name for the shipping rate
|
|
Display name for Standard Single Shipping |
Use this field to customise the name for the Standard Single Shipping rate that appears when choosing shipping method in the BigCommerce store checkout process. An example name for the shipping rate
You can also use Ultra Commerce’s shipping label macros to add more information to the shipping rate name when you are naming this shipping rate. Refer to Shipping label macros section below for more information. An example name for the shipping rate (with a macro)
|
|
Show Transit Time |
Check this option to show the number of delivery days next to the shipping labels when choosing shipping method in the BigCommerce store checkout process.
|
Shipping label macros
Shipping label macros are code snippets you can use while naming the shipping rates pulled from the Ultra Commerce OMS. By using the macros when naming the shipping rate, you can provide insightful information to your customers when they are finalising their purchase.
Currently, the Ultra Commerce Shipping Quotes app for BigCommerce supports the following macros when naming the shipping rates:
-
{{delivery-days}}
This macro obtains the number of days required to get product(s) delivered to the shipping location from the Ultra Commerce OMS and replaces {{delivery-days}} with the obtained information.
Change the Installation Details of the Ultra Commerce app
Sometimes you might want to change the tenant associated with the Ultra Commerce app. You may also want to change the region for the app.
To change the installation details for the Ultra Commerce app, you must uninstall and reinstall the app from your BigCommerce store. Follow the steps below to change the installation details of the Ultra Commerce app.
1. Log in to BigCommerce.
2. Go to the Apps menu from the menu panel on the left-hand side of the screen.
3. Click on MyApps.
4. Find the Ultra Commerce app and click Uninstall.
5. The Ultra Commerce app will be removed from your BigCommerce store.
6. Reinstall the Ultra Commerce app from the BigCommerce Apps Marketplace. Refer to the Ultra Commerce for BigCommerce Installation Guide for more information.
7. Reenter the installation details for the Ultra Commerce app.
FAQs
- How can I change the region for the Ultra Commerce app?
To change the region for the Ultra Commerce app, you must uninstall the app and reinstall it. Then, you must reenter the details as asked in the installation screen.
- How can I change the tenant associated with the Ultra Commerce app?
To change the tenant associated with the Ultra Commerce app, you must uninstall the app and reinstall it. Then, you must reenter the details as asked in the installation screen.
- Is it mandatory to enter the Rate Token during the app’s Configuration?
Yes, it is mandatory to enter the Rate Token during the app’s Configuration.
- Where can I find the Rate Token that I need to enter during the app’s configuration?
You can get the Rate Token at the end of the Ultra Commerce app installation process. You can also click on the Ultra Commerce app from the MyApps page in BigCommerce and find the Rate Token at any time after a successful installation.
- Can I download the Ultra Commerce app for free from the BigCommerce Apps Marketplace?
Yes, the Ultra Commerce app for BigCommerce is free to download from the BigCommerce Apps Marketplace.